Posts

Showing posts with the label Terrain

3D Terrain

Image
When I run games, I try to limit the potential for players to diverge in their understanding of the 3D space in their imagined versions o events. I like everyone to be on the same page, and to share a collective understanding of how things are unfolding, especially when a game starts getting tactical. A lot of this probably comes from playing with miniatures where the tactical play is literally laid out with physical pieces of terrain and small figurines that depict the characters. Don't get me wrong, a also like a good game where theatre of the mind has been executed well...but I've see so many arguments at tables of the years where one person has a distinct impression of how things are unfolding while another person is viewing things in a very different light. In such a case, both might be valid interpretations, but are often irreconcilable. The slowing down, and sometimes complete disruption, of the game is undesirable. It's probably one of the reasons I like a good LARP...

Tulou and Fortress (Part 15) - The Floor

Image
We're getting closer.  I bought a clay roller from an online craft supply store a few months ago, specifically with the intention of using it in this project. However, I misplaced it and only found it again the other day. I also bought some air-drying clay so that I could use it with the roller, but without the roller there wasn't much point opening it up and doing that part of the model.  The aim was to create cobblestone sectors for the inner courtyard, divided along segments that would centre on the temple, or whatever this particular tulou's centrepiece was.    On rolling out the clay, different plans emerged. I figured that it might be more fun to make a shattered courtyard, something looking more like a place that was regularly subjected to warfare. I had this idea because the clay crumbled and shattered a bit, so it wasn't the original clean flooring that I had hoped...and I didn't want to waste the bits that I had made. The plan still works, and now...

Tulou and Fortress - Update

Image
  They're here. I've been so busy with other stiff, while building the Tulou and Fortress on the side, that I didn't even realise that the Cathayan Miniatures have already dropped.  Now it's just a case of gathering together some funds, buying a battalion box, and a sky lantern box, and a shugenja riding a dragon, and... this is going to get expensive. Then finish the tulou before they get here.  

Tulou and Fortress (Part 14) - Filling in the layout

Image
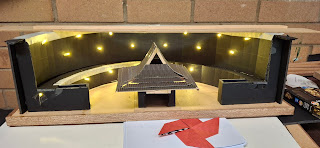
We've got the basic frame of the Tulou, so now it's time to start filling in the interior of the model. I begin with adding some pillars which will hold the layers in place.    The pillars also form the end points of walls. For the walls I've cut some pieces of MDF to match the length between the pillars, I've also cut some gaps from them for doors and windows. I haven't specifically decided on the proportions here, or the design of the doorways and window shutters, I'll have to do a it more research for this, but having the holes for the doorways and windows is a good start.  The lights are working in there, so I'm happy about that. The next bit is to clad the mdf sheeting with wood panelling to make the walls look more like wooden walls than mdf walls. So I have some sheets of balsa wood that I'll be cutting into thin strips and gluing to the walls. Some kind of staining should be applied later, once the glued strips have dried in place. The whole thin...

Tulou and Fortress (Part 13) - Adding some colour

Image
It's time to start applying some colour to the model. With the level of of texturing and detailing that I have added to it. The easy way to get the majority of colour onto the model is by drybrushing some suitably earthy tones onto the form.  This is done for the tulou and the little temple that goes in the middle. I found a brown ochre shade, but that doesn't feel quite right. So in order to get something that's a bit closer to terracotta I've adding in a mix of some red and some black to darken it down in a first heavy drybrush coat. The second coat is done lighter (in the sense of colour, and the sense of less paint going on)...for this one we just use the straight ochre paint. A final really light drybrush coat uses a 50/50 mix of the ochre and white. I'm still not happy with the result and there will probably be some washes and extra detailing to get to what I'm after, but it's really brought out the texture and that was one of the main intentions at th...

Tulou and Fortress (Part 12) - Further Texturing

Image
Hmm... I was sure I took more progress pictures before writing this... Anyway... The point of this post is that you often need to apply surface details before adding a texture over the top. These surfacedetails don't need to be much, they just need to add some visual interest and break up any large flat surfaces (unless that's the specific look you're going for, such as the outer wall on the tulou.  The next step will be adding some paint, so I'll try to make sure there's plenty of extra photos then.

Tulou and Fortress (Part 11) - Texture Beginnings

Image
Here's where we left things... It's a bit like the flat polygon models in 3D computer graphics, it only takes on a more distinctive and interesting appearance once textures and colours have been added to the model. I'm making the interior of the tulou with wood, building up a framework and staining it to look appropriately aged and lived in. However, the part that I'm working on at the moment is a stone wall covered with hard packed earth. So I'll be looking for something with a bit of texture, but not too much. The first step is to get the model into position, then apply a layer of a glue that will adhere to both the foamcore surface and the intended texturing material. I'd often use sand or dirt, especially if I were making castle walls built of stone, roughly textured ground, or roads. In this case, the wall is pretty smooth, almost like a cement render, so I need much finer particles. I was cleaning up one of the linishers in the school workshops and found s...

Tulou and Fortress (Part 10) - Let there be Light

Image
The shrine in the middle is looking alright. So it's time to head back to the outer shell.  I'd preciously cut and scored the foamcore so that I could bend it to the right curvature. Now it's time to add the electronics to the piece before construction work begins. It needs to be done now because it will be harder later to pull the model apart and wire in the lighting.     The next step here is the make some structural elements out of foamcore that will support the outer walls. Thankfullt for this project, the outer walls are circular so they're generally self-supporting. However, they'll still need to be able to support figurines on them because they're intended as miniature terrain rather than a model.    I've cut the end cross sections of the wall, and scored them in much the same way that I've demonstrated earlier in the project. Folding right angles, taping while glue dries, holding them to shape (this time with clamps), and gluing them to the base ...

Tulou and Fortress (Part 9) - Roofing the Shrine

Image
I've actually done a decent amount of work on the shrine since my last post about it. However, in the meantime I've been in hospital and there have been a few other issues... So, where were we.. Oh... that's right. We've got the shape of the stonework building. Now to put a roof on it. We're doing that from pieces of wood to build a structure that can be removed as needed. First step is getting the angles. I could do this with trigonometry, calculations on a page, or tricks with compasses, but I'm just going to lay the pieces of wood against the existing structure, line them up and draw the bits I need. With the two pieces overlaid, I get where the shapes will be fitting together and identify where I'll need to be cutting. I've done some rough sketches and have got a good idea of how I want the general shape to look, but I'm allowing room for evolution and unexpected elements to guide the design as necessary. Needing some cross beams for structure, I...

Tulou and Fortress (Part 8) - Focusing on the middle.

Image
As it stands, two halves able to be divided for better access to the middle, better display options, and easier storage... with a modular section in the middle.The middle section is an interchangeable 10cm x 10cm square.   I've cut a few of these already from 3mm MDF. The first two modular middle sections will be a small temple structure, and a "sacred tree". I haven't decided on the third, but it might be a well, a variant temple/shrine, or a statue to a hero...I'll probably do them all and use them as scatter terrain. For the moment, I'm working on the small temple. Like the wider building, we've got a layout to go onto some foamcore. This is cut out, with V-shaped groove in one side of the foamcore while the other side remains intact. his allows the material to fold well, while maintaining its structural integrity.  When folded, I just use PVA glue, which tends to work fairly well, and once texturing goes over the surface, this reinforces any joints. As...