Posts

Showing posts with the label cosplay

Notebook 1 - Circa 2001

Image
It was my finding of this notebook that prompted this series of posts.   When I found it again during my art studio clean up at the end of 2025 I remembered the notebook, but I couldn't remember when I was writing in it. I've seen it in my notebook piles for years and every now and then I've cracked it open to see if "past me" could give "current me" some inspiration. Like a lot of my notebooks, there's artistic practice and drawing exercises scattered through them. This was obviously in one of my "stippling" phases, which I've gone through a couple of times after a few conversations with artists I've met of the years. When artists I respected like Keith Parkinson told me that they'd never been able to get the hang of stippling, it was probably a combination of hubris and spite that got me to practice the technique. Other pages are sequences of worldbuilding ideas... this instance is the start of an idea about a sci-fi setting b...

Observing the Fox

Image
I don't often take selfies... ...but I'm relatively happy with the way this one turned out.

Archery Bracers

Image
I haven't been posting much lately, because I've been making costuming and props for my regular LARP game. The most recent thing I wanted to produce was something along the lines of these. The first couple of times I used my LARP bow, I ended up with welts and bruises up the inside of my arm when the bowstring hit it repeatedly. So I decided that I needed to make something that added a bit of protection to that area. In ongoing use, I found that the bowstring hit my inner arm far less, so I probably don't need the protection any more, but in the heat of battle, with bowstrings drawn quickly and arrows shot off instinctively, the bracers will still prevent the occasional arm hit from the string. For the material used in this project, I had bought a few leather jackets from local second-hand stores, some black, some dark brown, some light brown, a range of leather thicknesses. On average about $6 each ($4-10) for an assortment of leather ready to go. The first thin...

LARP Scale Armour (The Verdict)

Image
The reason for building the scale armoured sleeve was today's LARP. It seemed odd to run a LARP in the lead-up to Christmas, a time when families are gathering for BBQs, workplaces are holding their end of year Christmas parties (and closing down for the holiday period), but the majority of players assured me that they'd be in attendance, and a few even told me they'd be bringing new players along. So, with a dozen regular players, a few irregulars promising they'd show up, and a number claiming that they'd be bringing some new faces, I had no idea how many people would actually be in attendance. It could have been as many as 20, it could have been as few as 10 (based on promises)... I had to be prepared for the most, because if there's one thing I can't stand, it's leaving players bored. I've been to too many LARPs where the story is based on the activities of a select group of players while everyone else just lingers on the edge of the sto...

LARP Scale Armour (Part 3)

Image
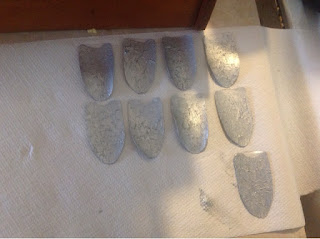
With the scales cut and painted, and the sleeves of the hoodie marked out, it's now time to sew the scales on, and make the final piece... ...or so I thought. I had hoped I could attach the sclaes to the sleeve with a pair of holes at the top of each scale, and if I had used a more sturdy material for them this might have worked. But as it is, the scales are too flimsy, and bend too easily with only a pair of holes. I also found that the spacing lines marked on the sleeve were probably a bit too far apart, so that means making some further adjustments to the pattern before sewing can properly commence. Each scale is roughly 65mm long, and 35mm wide, and I had made the spacing lines roughly 50mm apart, this was to ensure some overlap...but there just wasn't enough overlap for my liking once the scales actually started being put solidly into place. So for every 2 spacing lines, I've ended up sewing three rows of scales (basically creating rows of scales that ...

LARP Scale Armour (Part 2)

Image
At the end of part 1, we were cutting up 150-odd scales out of a dozen soft drink bottles. Not sure whether this would be enough (but seriously suspecting it wouldn't be). The next stage is to get these scales to stop looking like cut out pieces of plastics, and instead make them look like polished pieces of metal, or insect chitin, or some other material from which our armour is made (in the context of the game) at the moment, this project is proof of concept, so I'm taking a deliberately simple course of action. I've considered that later repetitions of this armour might see every scale painted with a dark green vein, then lighter green to represent a series of leaves, but for the moment, a simple silver will suffice. Painting Step The silver needs to be protected from the hits of the swords, so I'm going to use one of the properties of the material to it's advantage...that being its transparency. I'm going to paint the underside of the scales. Thus givi...

LARP Scale Armour

Image
Here's a little project I've been working on over the last day or two. I've got some LARP armour I've been building from scratch. It started as an iteration of my long term Iron Man cosplay, but starting heading away from that template, so it became something quite different. A chestplate, and separate abdomen piece. I decided that I needed some arm and leg protection, something flexible...so I went with scales. A bit of research shows that there are numerous ways that armour scales can be connected to one another as lamellar armour, so there's no "wrong" way to do it... especially when this particular armour is designed as a fantasy project. There are three key things that need to be taken into account. First, it needs to be flexible; allowing for good freedom of movement for fighting and running. Second, it needs to be sturdy; not necessarily capable of protecting from full thrusts and strikes from potentially lethal metal weapons, but capable ...

One from the vault

Image
Digging through my art supplies as I try to complete a suit of LARP armour, I found this guy. He's got to be at least 4 years old because I remember sculpting him to this level when I was doing the Goblin Tarot.  I must get around to finishing him, and giving him a body some day. Maybe he'll be the pilot of a "goblin mecha" cosplay concept I've been thinking about for a few years.

Props for LARP and Cosplay (Part 6 - Final)

Image
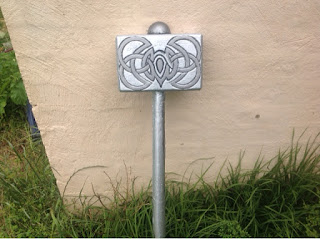
By the time I'm writing this, I've done my workshop at OzComicCon describing props and weapons for Cosplay and LARP. I was pretty nervous in front of a crowd of people I didn't know (except for 3 people in a group of maybe sixty), I asked for questions but few came, so I basically talked for half an hour using a bunch of demo props which were handed around the audience...then I kind of ran out of things to say. But people seemed to enjoy that half hour... Not many people left in the middle of it. Anyway, here's the final piece with a bit of shading. I'm using a flexible metallic acrylic paint on the piece to coat the whole thing, then I added some black ink to the paint for the purposes of really bringing out the "etchings" in the hammer head. I've got two colours of this metallic paint, one silver and one bronze, so I decided to make the knotwork bronze so that it would really stand out. The problem is that the bronze paint is duller and da...

Props for LARP and Cosplay (Part 5)

Image
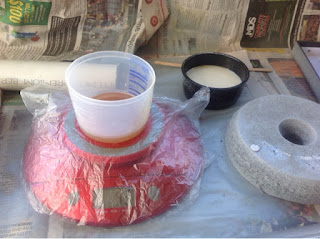
The foam I'll be using for the shaft is the same stuff I've previously used for coreless LARP throwing knives and a metal-cored swordstaff. There are a few consistencies of foam available. If a foam is too hard it doesn't compact when the weapon hits someone, that hurts. If a foam is too soft, it compacts too much and and core within the weapon impacts the target, that also hurts. A moderate foam somewhere between these extremes collapses just enough but not too much. The designation of foam I'm using from Barnes is called S-Foam 50. It mixes in a weight ratio of 100 to 45, so I pull out the kitchen scales and wrap them in a freezer bag to prevent foam getting on them (after all, these scales are normally used to handle food). I turn them on with the mixing cup already on the scale, which means the scales will only measure the chemical, not the cup. The two parts are measured separately, then the two are mixed together.     The mixture takes a minute or so...