Props for LARP and Cosplay (Part 6 - Final)
By the time I'm writing this, I've done my workshop at OzComicCon describing props and weapons for Cosplay and LARP. I was pretty nervous in front of a crowd of people I didn't know (except for 3 people in a group of maybe sixty), I asked for questions but few came, so I basically talked for half an hour using a bunch of demo props which were handed around the audience...then I kind of ran out of things to say. But people seemed to enjoy that half hour... Not many people left in the middle of it.
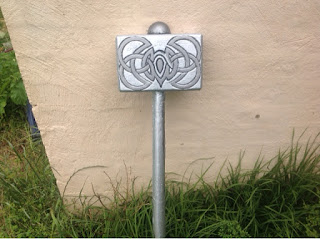
Anyway, here's the final piece with a bit of shading. I'm using a flexible metallic acrylic paint on the piece to coat the whole thing, then I added some black ink to the paint for the purposes of really bringing out the "etchings" in the hammer head.

Anyway, here's the final piece with a bit of shading. I'm using a flexible metallic acrylic paint on the piece to coat the whole thing, then I added some black ink to the paint for the purposes of really bringing out the "etchings" in the hammer head.

I've got two colours of this metallic paint, one silver and one bronze, so I decided to make the knotwork bronze so that it would really stand out. The problem is that the bronze paint is duller and darker so it didn't really give the effect I wanted. after painting a small part of the knotwork with this colour, I mixed the bronze and silver to give an off colour effect and while it looked like two different grades of steel used in the hammerhead's construction, it really didn't pop.
That led me to a variant idea. I had some metallic gold powder. I don't think it's real gold, it certainly wasn't as expensive as I'd expect real gold to be. Over a coat of wet metallic paint I sprinkled the gold dust so that it would embed in the knotwork (focused in the middle), and make a good focal point for the weapon.

The last thing I did was bind a few points on the shaft with medical tape. Mostly to cover problem areas where the moulding process didn't work well, but also to show where the weapon might need to be held when used in battle. All in all, I'm pretty happy with this as a prop...now it's just a case of seeing how well it fares on the battlefield.
.png)

Comments